Are you curious about how to get VPN on iPhone? There are three primary ways that you can install a VPN on your iPhone (which also works on your iPad, FYI). We’re going to look at each of these three methods, explain the pros and cons, and then walk you through the installation process.
Key Takeaways
- Three main methods for installing a VPN on an iPhone include manual configuration through settings, using a consumer VPN app, or opting for a browser-based VPN, with the latter being the most convenient for many users.
- Recommended VPN apps for iPhone in 2026 are NordVPN (best overall), ExpressVPN (best app), and Surfshark (best value) due to speed, security features, and ease of use.
- Manually configuring a VPN on an iPhone offers greater control but requires more technical knowledge to input server details correctly.
- Using a browser VPN like Tor encrypts all your iPhone’s internet traffic at the system level, combining VPN and browser privacy benefits in a single app.
It doesn’t matter whether you’re required to use a VPN to connect to your company’s network or seek to hide your internet activity from your internet service provider.
In both cases, you’ll want to have the VPN installed on the one device that you keep with you almost all the time:
Your iPhone.
Thankfully, the process of installing a VPN on an iPhone isn’t very complicated, and your choice between the three methods listed below is often dictated by what kind of VPN you’re using.
My hope is that by the time you finish reading this iPhone VPN tutorial, you’ll have everything set up and ready to go!
Let’s dive in.
Note: Some of the links in this article are affiliate links, which means that at no extra cost to you, I may be compensated if you choose to use one of the services listed. I only recommend what I personally have used, and I appreciate your support!
Methods for Installing a VPN on iPhone
Before you do anything, take a moment to look through the three different methods to make sure you have a clear understanding of which will be the best option for you.
They each have their pros and cons, which I’ll spell out below.
Thankfully, none of them are extremely hard to do (even the manual installation), particularly if you follow the screenshots provided step-by-step.
Method 1: Manual VPN Installation on iPhone
For corporate VPN users and those who set up their own virtual private network, the most common method to install a VPN on an iPhone is manually. This means that instead of an app, you’ll have to log into your phone settings and set it up yourself.
Each manual installation is a little different depending on the protocol and how the VPN has been set up.
Generally speaking, the process goes like this:
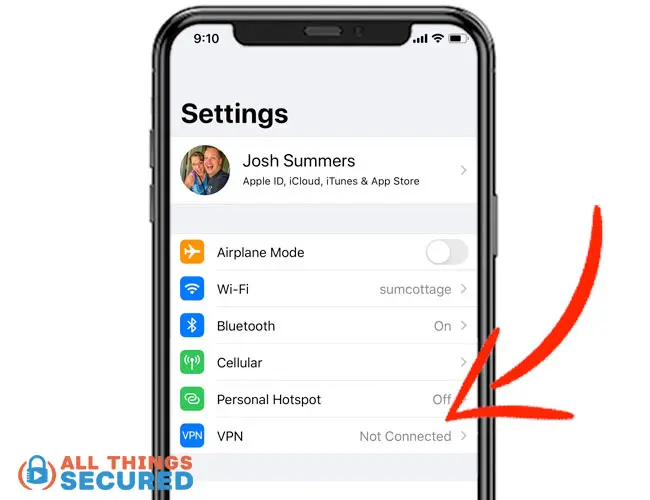
- Step 1: Open Phone Settings and Find “VPN” – Go into the settings app on your phone, and right below “Personal Hotspot” you’ll see the “VPN” tab.
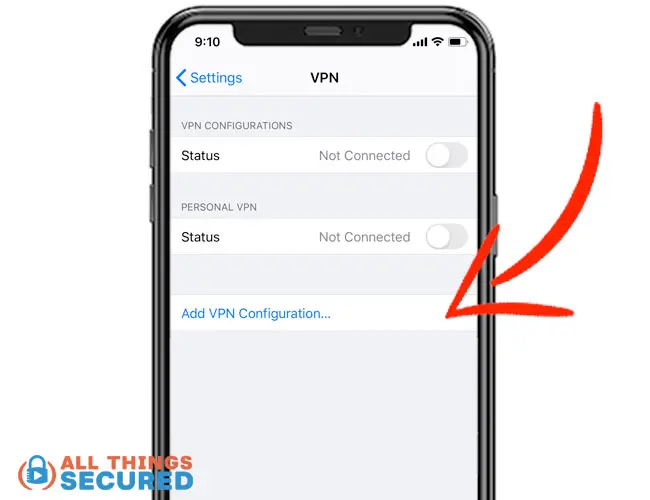
- Step 2: Click “Add VPN Configuration” – This button is usually found toward the bottom of the VPN tab settings.
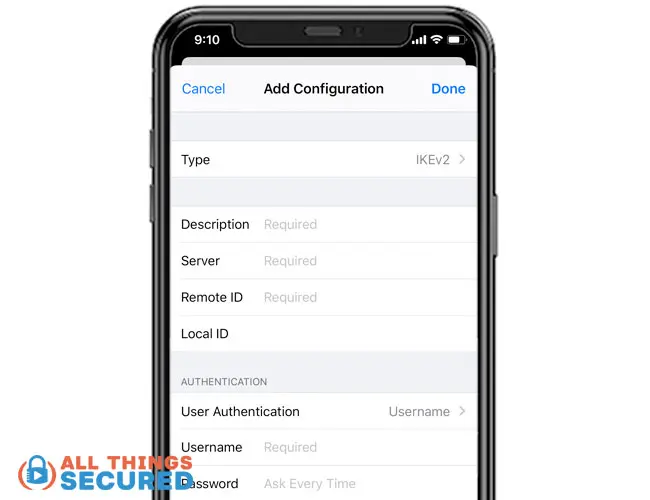
- Step 3: Choose the appropriate Connection Type – This is important! Before you start inputting all the data, make sure you have the correct “Type” chosen. The required inputs will change based on this selection.
- Step 4: Input All Required VPN Data – This could include the address of the server, the account, the password, the secret…again, it all depends on the VPN type.
- Step 5: Test the new VPN Connection – Once you’ve input the data and created the VPN configuration, you’ll want to test it by clicking on the “Connect” button. If it is successful, you’ll see the little VPN icon in the upper-right corner of your iPhone.
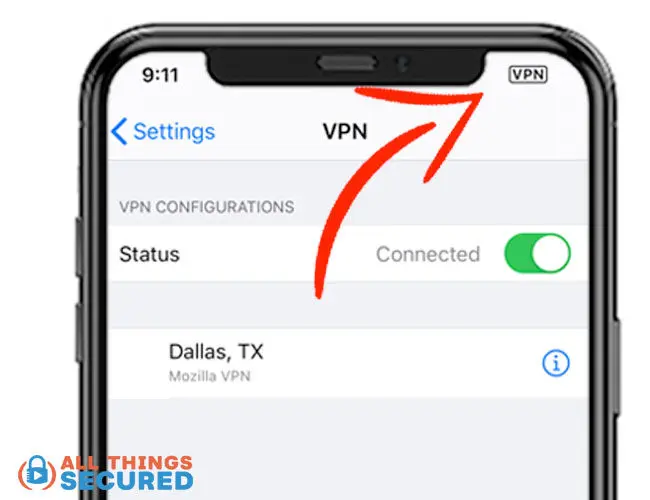
Of course, if the configuration fails, you’ll want to start troubleshooting your iPhone VPN. There are a few steps listed below to get you started.
There are different pros and cons to this VPN installation method:
Pros
- Control over your VPN setup;
- No paid subscription requirement;
Cons
- Requires a VPN to be set up first;
- Not a user-friendly process;
- Only one VPN server per configuration;
A potentially easier method for those who aren’t as tech-savvy would be to install a VPN app such as I’ll explain here in method #2.
Method 2: iPhone VPN App Installation Setup
The second method for installing a VPN on an iPhone is also the easiest and most common:
Downloading a consumer VPN app from the app store.
I’ll go into more detail on my recommended iPhone VPN apps, but for the sake of explaining this method, I’m going to show you using NordVPN as an example.
- Step 1: Search & Download the VPN from the App Store – Any good VPN provider will have an app you can download on the App Store. Find what you’re looking for and click “Download”.
Important!
I recommend you set up the VPN on your desktop instead of subscribing through your iPhone. Apple makes it so much harder to get a refund if you decide you don’t like the VPN you choose.
- Step 2: Log into the VPN app – Since you’ve already created an account with this VPN before downloading the app (see the “Important” notice above), you can easily log into the VPN app on your iPhone using the credentials they gave you.
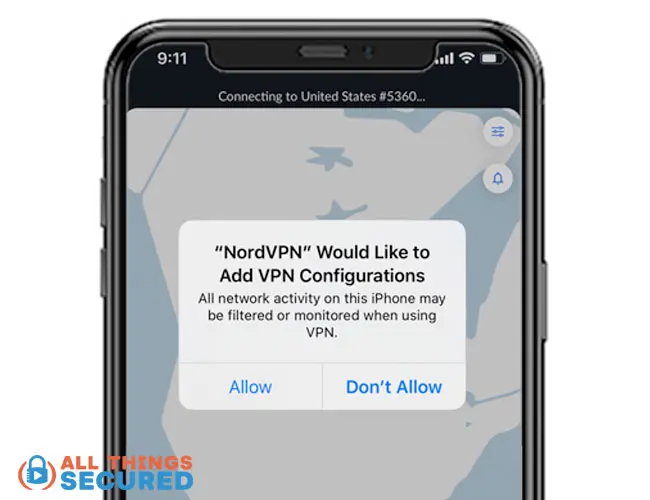
- Step 3: Allow automatic VPN Configuration – When you first install the app and try to use it, your iPhone will ask if you want to allow the app to add VPN configurations for you. The answer here is “Allow”. You’ll be directed to the settings app where you might need to input your phone passcode.
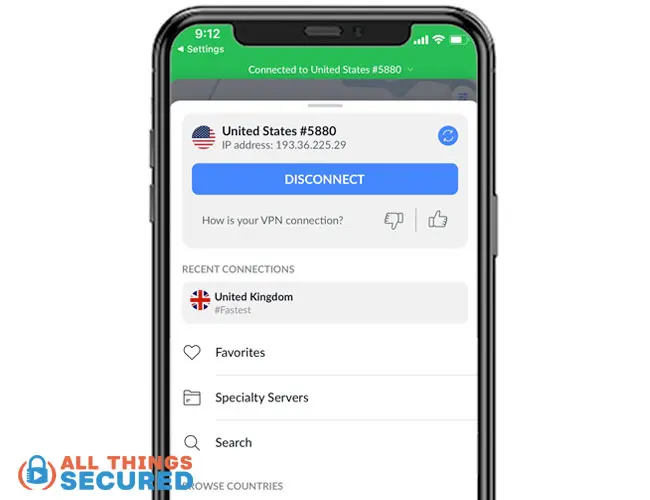
Once you’ve allowed the VPN to create that configuration, you should have access to all of their VPN servers. There’s no need to create additional configurations and you won’t even need to go into the settings app to turn it on.
It can all be done through the VPN app on the iPhone.
Pros
- Easy to install and set up;
- The VPN service encrypts your traffic, hiding it from your internet provider;
- One configuration allows access to thousands of VPN servers;
- Customer support available;
- Additional VPN features available;
Cons
- Requires paid subscription (I don’t recommend free VPNs);
- Can’t be used with corporate VPN setups;
- Limited control over how your data is transmitted and handled;
As I stated earlier, using an app as a means of installing a VPN on an iPhone is probably the most common.
However, there is yet one more less-common method: directly through your browser.
Method 3: Tor Browser VPN Setup for iPhone
While the majority of people use Safari or Chrome as their internet browser on their iPhones, I tend to recommend more privacy-focused internet browsers such as Firefox, Brave, or the Tor browser.
Within the Tor Browser – along with a few other such browsers – you can install and use a VPN to surf the internet.
This method is very similar to method 2 above because, well…it mostly is the same.
- You’re still downloading an app from the app store.
- That app is still automatically creating a VPN configuration for you on your iPhone.
- You need to turn on that configuration to connect to the VPN.
On your desktop, browser-based VPNs only work for any data transmitted through your browser. They don’t encrypt and secure other apps on your computer.
For your iPhone, however, it still works on a system level, which means that your entire internet connection goes through the encrypted tunnel. Any app you open to use the internet will be routed through that VPN connection on your iPhone.
Pros
- Automatic VPN configuration;
- Encrypts your entire iPhone internet connection;
- Combines VPN encryption with Tor privacy;
Cons
- Slightly more confusing to set up;
- Requires a paid subscription;
Overall, I prefer method #2 over this browser method, but it’s entirely up to you.
Best VPNs for iPhone iOS Devices in 2026
Pretty much every VPN on the market today has developed an iOS app for devices like the iPhone and iPad.
It would be pretty stupid not to!
However, not all of these can be considered the best VPN for iPhone. Some are clunky, some don’t offer great features and some are incredibly outdated.
This is what I recommend as the top 3 best VPNs for iPhone and iPad devices.
These are the ones I recommend. Often these recommendation differ based on operating system and usage, so this is what I suggest for:
- Best VPN for Gaming (when latency is key)
- Best VPN for Streaming Content (when speed is key)
- Best VPN for Netflix (to bypass georestrictions)
Troubleshooting Your iPhone VPN Connection
In a perfect world, you would never have problems installing a VPN on your iPhone.
But that rarely happens, does it?
One of the reasons I recommend using a consumer VPN is because they also come with customer support. If you run into problems, the first thing you should do is contact customer support where available
Unfortunately, that’s not always possible, particularly when you’re manually installing a VPN. In these cases, here’s a quick troubleshooting checklist to run through:
- Did you choose the correct VPN type? This is the most common mistake I see when people try to install a VPN on an iPhone. There are many different VPN connection protocols, but the iPhone only gives you an option for IKEv2, IPsec, and L2TP. Make sure you’ve chosen the correct one.
- Did you input all the data correctly? I know it seems elementary to say this, but even one incorrect letter or number could throw your whole configuration out of whack. Check with your VPN administrator to make sure you have all the info that you need and that you’ve entered it correctly.
- Do you have an open connection to the internet? Check to make sure that you have a working internet connection. Also, in some cases, you may find yourself on a restricted network (such as a university) where a firewall may block access to a VPN’s secure connection.
- Can any other device connect to this VPN? Sometimes it helps to set up the VPN on another device simultaneously to make sure the problem is local and not on the VPN server side.
Again, if you’re still running into problems as you set up a VPN on your iPhone, connect with your IT manager or the VPN company directly.
Final Thoughts | Using a VPN on iOS Devices
While a VPN doesn’t solve every privacy and security problem, it is a great first step to securing your iPhone. It’s one of many steps, including getting a new private phone number for your phone, that will make a huge difference in your day-to-day life.
You’ll want to use a VPN on your iPhone to:
- Stream geoblocked content;
- Access censored internet;
- Encrypt your data on a public network;
If you’re looking for a solid consumer VPN for your iPhone, I recommend NordVPN, although there are plenty of other good ones to choose from.
Be sure to subscribe to the All Things Secured YouTube channel!

