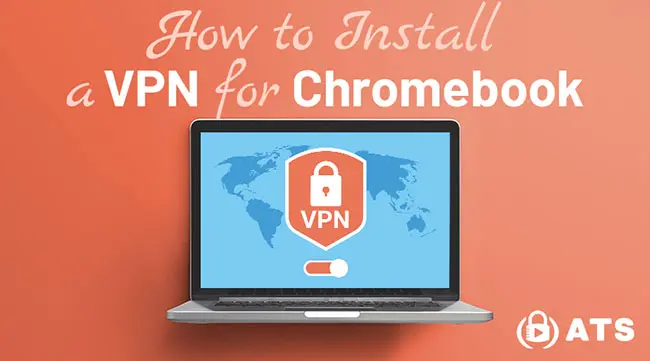
If you’re hoping to install a VPN on your Chromebook, whether it’s your personal computer or a school Chromebook, this tutorial is going to walk you step-by-step through four different methods to make sure you can find one that works for you.
There are a number of good reasons why you might want to install a virtual private network on your Chromebook. Using a VPN can help in bypassing school restrictions and network restrictions, allowing you to access blocked content and maintain privacy.
Perhaps you want to access content that has been restricted or censored by the powers-that-be. Or maybe you want to stream the Netflix library from another country
Or maybe you’re old-fashioned and you just want some extra encryption and privacy for your internet connection.
Whatever the case may be, there are four different ways to install a VPN on a Chromebook that we’re going to cover here in detail:
The methods above are listed easiest to hardest, and in the written tutorial below I’m going to explain not only how to do the Chromebook VPN setup, but also the pros and cons of each method.
Let’s dive in!
Note: Some of the links in this article may be affiliate links, which means that at no extra cost to you, I may be compensated if you choose to use one of the services listed. I only recommend what I personally have used, and I appreciate your support!
Why Use a Virtual Private Network (VPN) on Chromebook
Using a Virtual Private Network (VPN) on a Chromebook is essential for protecting your online activity and accessing geo-restricted content. A VPN creates a secure and encrypted connection between your Chromebook and a VPN server, shielding your online activity from anyone who might try to intercept it.
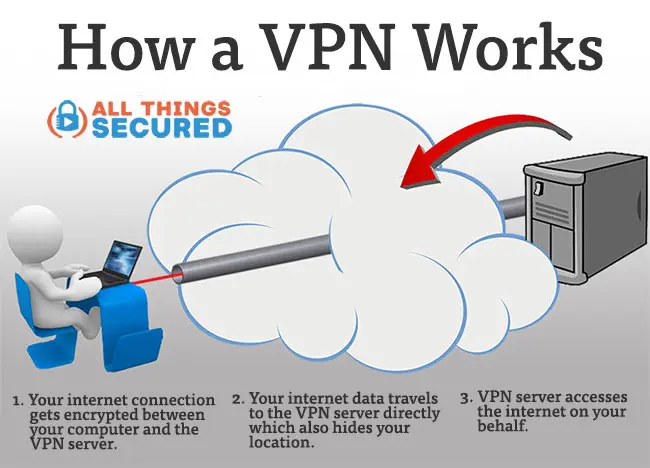
This is particularly important when using public Wi-Fi networks, which can be vulnerable to hacking and eavesdropping. By using a VPN on your Chromebook, you can ensure that your online activity remains private and secure.
Choosing the Right VPN for Chromebook
Choosing the right VPN for your Chromebook can be overwhelming, given the numerous options available. However, there are several factors to consider when selecting a VPN provider.
First, ensure that the VPN is compatible with your Chromebook and offers a user-friendly interface. Look for a VPN that offers a wide range of servers, fast connection speeds, and robust security features such as AES-256 encryption and a kill switch.
Additionally, consider the VPN’s logging policy and ensure that it does not collect or store your personal data. Finally, check the VPN’s pricing and ensure that it fits within your budget.
Method #1: Android App for Chromebook
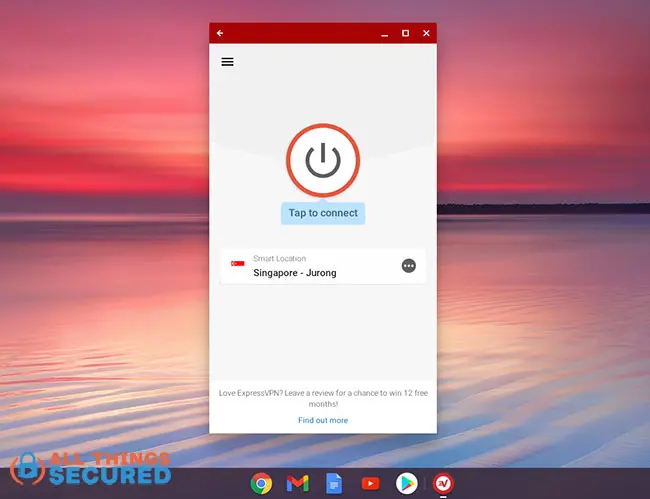
By far the easiest and fastest way to setup a VPN for Chromebook is by installing an Android VPN app through the Google Play store.
There are a number of advantages and disadvantages to this kind of setup, which include
Advantages
- Easy to download and install;
- Encrypts your entire Chromebook internet connection;
- Advanced settings available (protocol, split tunneling, etc.);
Disadvantages
- Not available on older Chromebooks;
- Larger download file than a Chrome extension (which is important if your computer doesn’t have much memory);
To install the VPN app, follow these instructions:
- Open the Google Play Store: For newer Chromebooks, this app is installed by default. For older laptops, you may need to go into the settings and enable the Google Play Store.
- Search for Your VPN: If you already have a subscription to a virtual private network, search for that and install it. If you don’t have a subscription, see below for my recommendations.
- Install & Open: The Android app should download in less than a minute and automatically open up. You’ll be required to input your account name and password as well as allow the app to create a VPN configuration (click “Ok”).
- Connect to the server!
It’s really that simple. Now your entire Chromebook internet connection is encrypted and routed through whichever server you’ve chosen.
Best VPN Android Apps for Chrome
- ExpressVPN: Overall, one of the most highly-rated services on the market. Chromebook settings allow for split tunneling and multiple protocols, including the new Lightway protocol.
- Surfshark: A newer service that has made a name for itself by offering unlimited simultaneous connections and low pricing. The Android app is easy to use and offers plenty of advanced settings.
- NordVPN: Extremely reliable service whose app gives you a visual map to choose your server. Android app includes the ability to choose different protocols, including Wireguard.
While you’re at it, make sure you spend some time changing the security settings for your Android device, be it your Chromebook or mobile phone.
Method #2: VPN Chrome Extension
Of course, for those of you who don’t have the option to use the Google Play store to install Android apps, you still have options. Because you can’t install apps, Chrome becomes practically your entire user experience.
Enter the VPN Chrome extension.
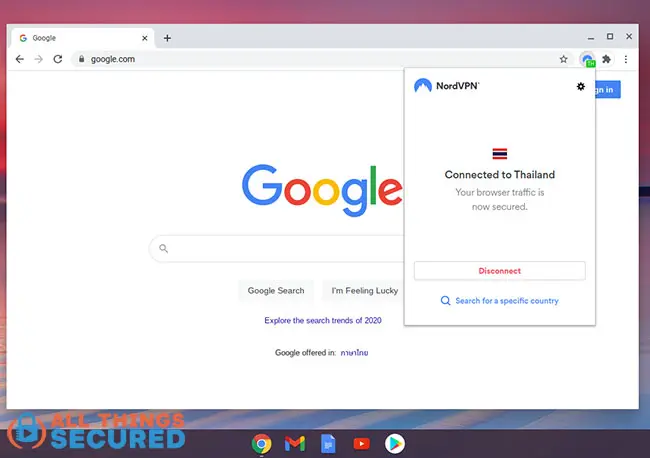
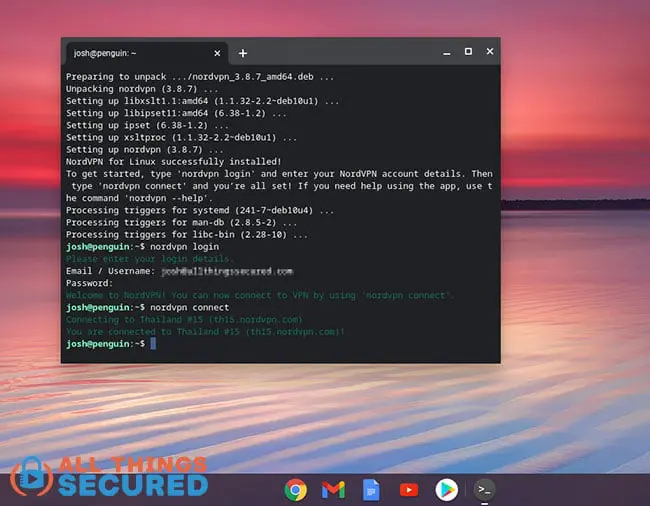
As you can see in the screenshot above, I’ve installed the NordVPN extension and connected to the Thailand server. At this point, everything that I do in my Chrome browser has been encrypted.
Advantages
- Extensions are easy to download and install;
- They work with a pure ChromeOS setup (i.e. without the Google Play Store);
Disadvantages
- Only encrypts your Chrome browser internet traffic;
- Not as many advanced settings available (compared to the Android app);
In order to install the Chrome extension on your Chromebook, you’ll need to:
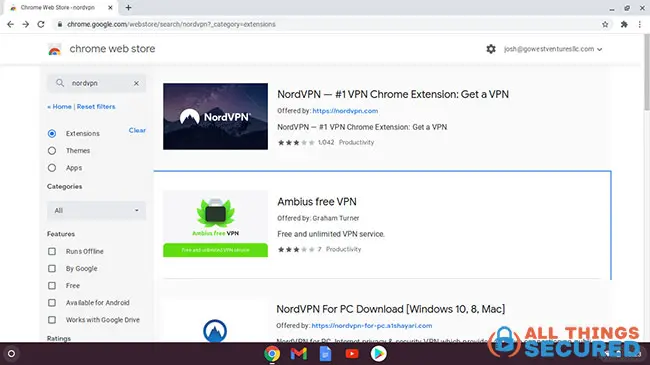
- Visit the Chrome Web Store: You can either visit the Chrome Web Store directly or click on the icon in your Chrome OS App Drawer.
- Search for your VPN & Install: For Chrome extensions, I recommend NordVPN, but you should choose whichever one you already have a subscription to.
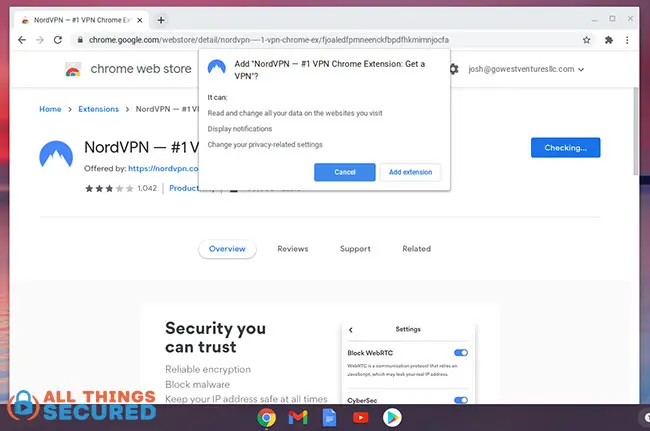
- Click “Add Extension”: Once you find the Chrome extension you want to use, you’ll have to confirm by clicking “Add Extension”. Don’t worry about the warning from Chrome here, extensions aren’t able to visit websites protected with https, which is why I always recommend you use https instead of http websites.
- Sign in and Connect: The extension should now show on the upper-right hand corner of Chrome. When you click here, you’ll be asked to sign into your service and allowed to connect.
Remember, the Chrome extension only encrypts and protects what you do within the Chrome browser. All other apps will not be encrypted.
Method #3: Manual Chromebook VPN Setup
If you can’t install Android apps and you prefer not to use a Chrome extension (or you still want to encrypt the entire internet connection for your Chromebook), the next best option is the manual setup, even though Google Chrome does not have a built-in VPN feature.
With a manual setup, you can create a system-wide connection using either the OpenVPN or L2TP protocol.
There are some other advantages and disadvantages of using the built-in Chrome OS client:
Advantages
- Unlike the Chrome extension, the built-in client encrypts the entire Chromebook internet connection;
- One-time setup, then just click “connect”;
- No extra software to download;
Disadvantages
- A bit harder to set up than Android apps or Chrome extensions;
- Extremely difficult to setup an OpenVPN connection;
- Not every VPN service offers an L2TP protocol option;
To setup a VPN on Chromebook using the built-in client, you’ll need to make sure you use a virtual private network service that offers an L2TP protocol setup (see below for suggestions). Then, you will:
- Open the Chrome OS VPN client: When clicking the bottom right settings menu, you’ll find and click “VPN” as you see in this screenshot.
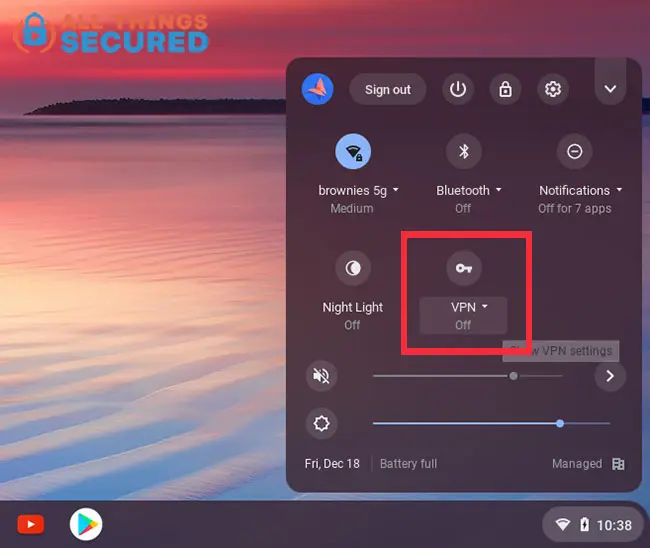
- Fill Out the VPN Configuration: This may end up being the most confusing part of the process. You’ll need to find the “Manual Setup” section for your virtual private network where they will give you the server address, username, password and shared key.
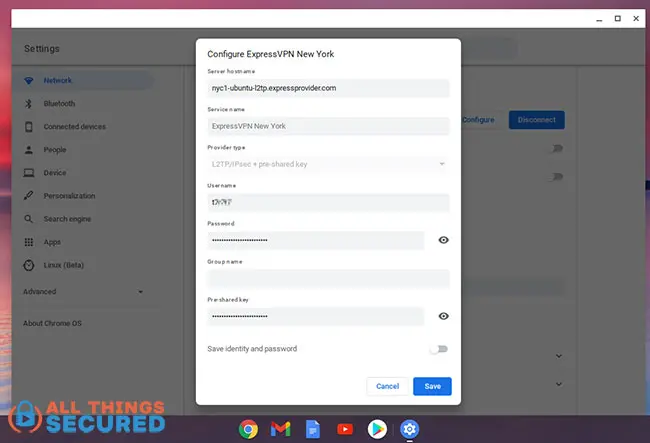
You will be choosing the “L2TP/IPsec + pre-shared key” option here, unfortunately. It’s not the most secure method of connecting to a virtual private network, but in this case it’s your only option.
- Connect to the Server: You’ll see a green “Connected” word when this is successful.
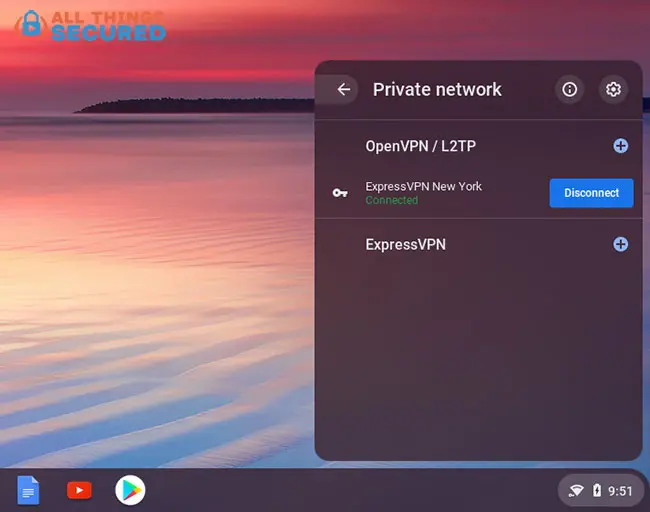
You can setup multiple manual connections for different server locations around the world. Simply click “Disconnect” to disconnect from the server or click the server you wish to connect to when you’re ready.
VPNs that Offer Manual L2TP Connections
- ExpressVPN: Under their “Manual Setup”, ExpressVPN gives you the ability to install an OpenVPN connection (which is helpful when setting up a WiFi router with a VPN) or the L2TP connection.
- CyberGhost: Under the “Download Apps” menu, you’ll need to setup a new device called “Other”, click on “Configure New Device” and make sure to choose the L2TP protocol. Unfortunately, each country server is counted as one of your 7 connections.
- StrongVPN: From within your account dashboard, you need to find “Account Setup Instructions”. This is where they’ll give you all the L2TP info you need.
Method #4: Linux App VPN Setup
Finally, I’d like to mention a seldom-used method of installing vpn services for those who have installed the Linux app on Chromebook.
It’s important to understand that a Linux connection will only encrypt and route Linux internet traffic, not Chrome OS or Android app connections.
A Linux VPN can be run simultaneously alongside the other options listed above, but neither provides encryption coverage for the other.
There are a small number of companies that have developed full Linux GUI clients that work on Chromebook, but most of the time you’ll be using the command-line client like what you’ve seen me do with NordVPN below:
Each VPN will have their own custom setup scripts, so you’ll need to visit your service’s setup guides to see exactly how they recommend you set it up.
Chrome OS utilizes Debian 10 Linux container, and thankfully most services have an app (GUI or command line) that will work well on Chromebook.
Tips for Using a Chromebook VPN
Congratulations on setting up a VPN on Chromebook!
In most cases, this is a set-and-forget type of connection, but here are a few tips for your day to day use that you should keep in mind:
- Test Your Connection: After you’ve first setup your server, go ahead and test your VPN connection to make sure you’ve done it correctly. The results should show the location of the virtual private network server, not your actual, physical location. If the VPN connection drops, some services can shut down your internet access to keep your web traffic secure and private.
- Understand Your Settings: Look through the VPN settings for your Android app to understand what you can and can’t do with your encrypted connection.
- Choose the Right Server: Depending on your particular use case, you’ll want to choose a server that is closest to you to get the right speeds. If you feel like your internet connection is getting slow, follow these steps to speed up a slow VPN connection.
Troubleshooting Common VPN Issues on Chromebook
If you encounter issues with your VPN on your Chromebook, there are several troubleshooting steps you can take.
First, ensure that your VPN is properly installed and configured. Check that your VPN is connected to a server and that your internet connection is stable.
If you are experiencing slow connection speeds, try switching to a different server or adjusting your VPN settings. If you are unable to connect to a VPN server, check that your VPN provider is not experiencing any outages or technical issues.
Finally, if you are still experiencing issues, contact your VPN provider’s customer support for assistance.
VPN on School Chromebooks: What You Need to Know
Using a VPN on a school Chromebook can be a bit more complicated than using one on a personal device. First, check with your school’s IT department to ensure that VPNs are allowed on school devices.
If VPNs are permitted, you can install a VPN app or extension on your Chromebook. However, be aware that some schools may block VPNs or restrict access to certain websites. If you are unable to install a VPN on your school Chromebook, you may need to use a different device or seek alternative solutions. Additionally, be mindful of your school’s internet usage policies and ensure that you are not violating any rules by using a VPN.
Be sure to subscribe to the All Things Secured YouTube channel!