How do I set up a hidden WiFi Network in my home? Although most security experts agree that this isn’t the most effective way to prevent hacking, there are possible reasons why you might want to create a hidden network. Whatever your reason, here’s a quick tutorial for how to set up a hidden network on your WiFi router, shown on both on an Apple Airport and a traditional WiFi router.
Be sure to subscribe to the All Things Secured YouTube channel!
The process of hiding the SSID (your “network name”) on your WiFI router isn’t as difficult as you might imagine. And although it’s not one of my top 5 tips for home network security, it’s an additional step you can take.
I’m going to walk you through the process step by step (including a video, if that helps).
Before we do that, though, it’s important to understand that:
- A hidden network can easily be discovered: In other words, this is not a strong security feature.
- A hidden network can be difficult: The process of setting up a hidden network is simple, but getting all your devices to re-find the network and connect to it is often a pain.
- Any network is only as secure as the password: No amount of hiding can protect a network with a weak password. This is why I use a good password manager app.
Personally, I’ve hidden my network just so that pesky neighbor kid doesn’t have an easy target.
My goal here is to help you understand:
I trust the step-by-step process will be helpful for you!
What is a Hidden Network?
A hidden network is simply a WiFi network that isn’t broadcasting the network name, known as the “SSID”. Instead of choosing from a list of network names, a hidden WiFi network requires a new user to input both the network name and password to connect.
In theory, this would mean that a hidden network is more secure, but unfortunately that isn’t the case.
The hidden SSID was never meant to be a security feature and free tools exist to help people “sniff out” hidden networks.
Still, since the average neighborhood hacker focuses on the easiest target, hiding your network could be one way to reduce the likelihood that he or she will target you.
How to Create a Hidden WiFi Network
The process of hiding your home network SSID will look slightly different based on your operating system (i.e. Mac vs Windows) as well as your individual WiFi router.
That said, you should be able to follow along with this 4-step process even if it doesn’t look exactly the same for you.
Step 1: Log into Your WiFi Router
The first thing you need to do in order to set up a hidden WiFi network is log into your router.
If you don’t know what that is, it’s usually the device next to the box your ISP (Internet Service Provider) gave you. In many cases, it is integrated into the internet box itself.
Accessing an Apple Airport on a Mac
For Mac users who are connecting via an Apple Airport, you’ll access your WiFi router through an app on your computer called “Airport Utility”. It looks like this:
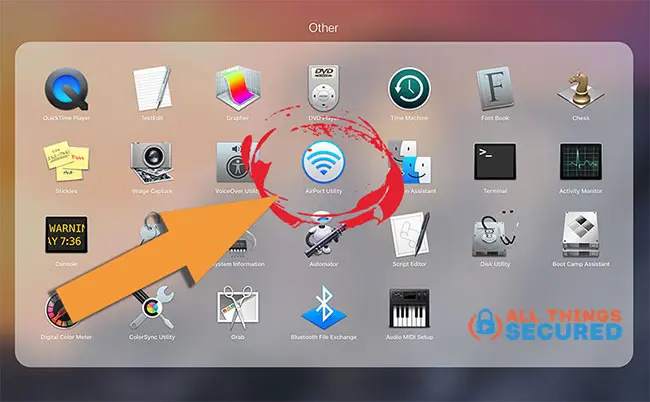
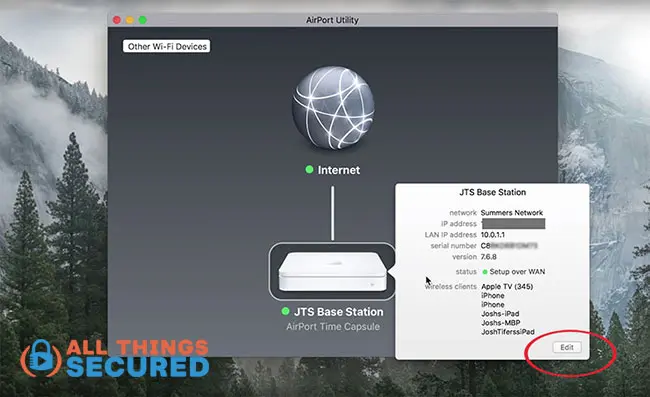
Once the AirPort Utility app is opened, you’ll click the Airport device you’re using and then click “Edit”.
If you’re not the administrator, you will be asked to enter a password.
Now that you’re logged into the Airport, you can move on to Step 2.
Logging In on Most Other WiFi Routers
For most any other router on the market, you’re going to start by putting on your reading glasses (the text you’re about to read is usually small!) and looking on the back side of the router.
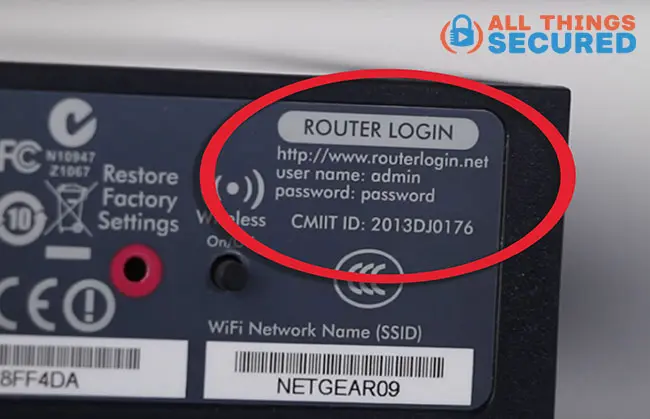
On the back (or bottom), you’re going to find something similar to what you see below, where it tells you the login, user name and password.
In this example, I’m using a Netgear router which you can see below below.
Can you see why locking down your router is so important?
With such a super-secure default password like “password”, it’s no wonder these things get hacked!
Sometimes the login won’t be a URL such as “routerlogin.net” like it is above. It might be a string of numbers like “192.168.1.1”.
In either case, just type the login address directly into your internet browser.
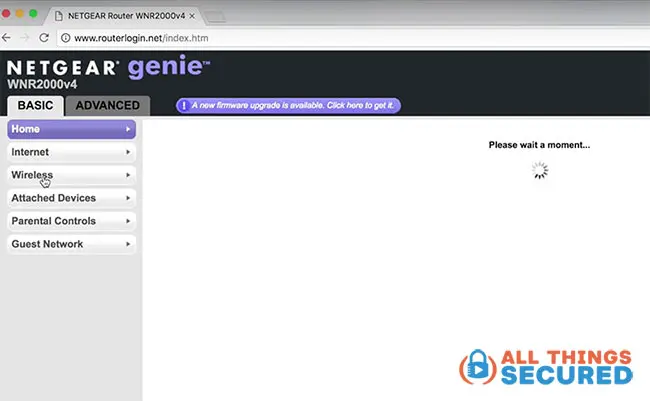
Every router looks different, but the end result is that you’ll be asked to enter the user name/password and then brought to a router dashboard. Here’s an example:
That’s it. You’re now logged into the administrator dashboard of your WiFi router.
Step 2: Find the Wireless Network Settings
Having logged into your WiFi router, you want to now navigate to the wireless network settings.
Within the Apple Airport Utility app, you’ll find that here:
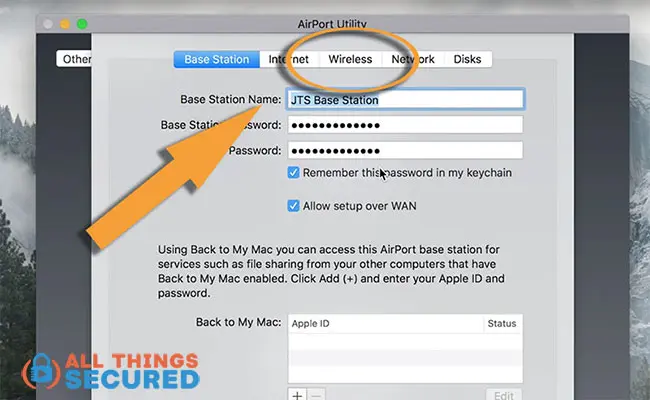
Within all other WiFi routers, you’ll just want to look for something that says “Wireless”, similar to what you see here:
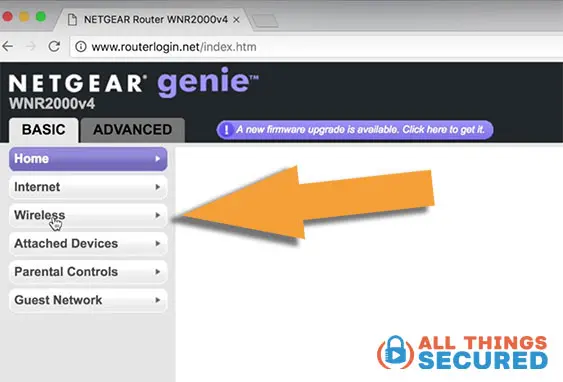
It should be pretty easy to find and if you can’t find anything that says “Wireless”, there’s a chance that your router isn’t a wireless router.
Step 3: Hide the WiFi Network
The only complicated part of this step is that every router has a different name for this particular setting. You’ll just need to look at everything to see what makes sense.
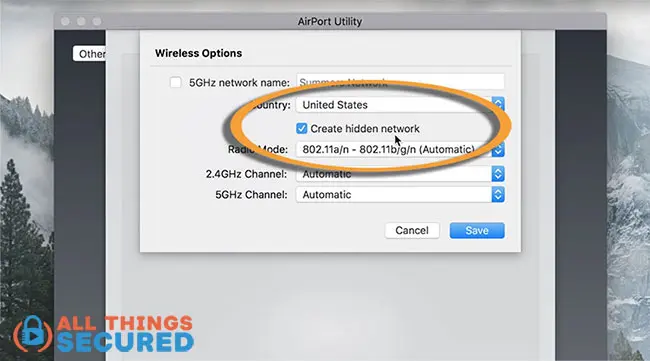
Apple does a good job of making things simple (as they usually do). Under Advanced Settings in the wireless menu, you’re going to find and check the box that says “Create a Hidden Network”.
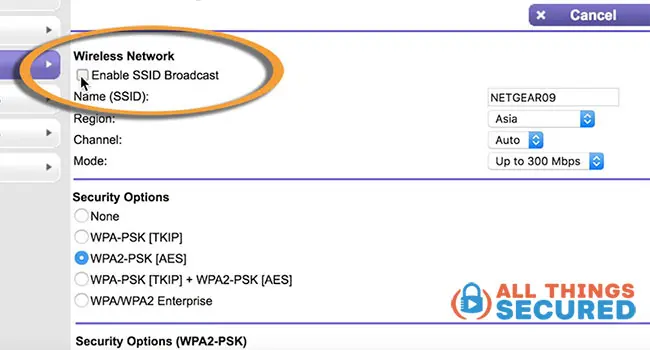
In the Netgear WiFi router that I’m using for this example, what I found is a setting that says “Enable SSID Broadcast”. SSID stands for “Service Set Identifier”, but that’s not important.
To start, this box was checked (meaning the network name was broadcast publicly). In order to hide the WiFi network, I need to have it unchecked.
Once you save your settings, you’ve now created a hidden network on you Apple Airport and disabled the broadcast of your SSID in the Netgear router (which is the same thing).
IMPORTANT: Make note of the name of your network. You’ll need this for the final step below.
Once you save the settings, the name of your network will disappear from the available networks when your device is searching for it. You may even lose your connection to the internet.
That’s ok…move on to the final step.
Step 4: How to Connect to a Hidden Network
If your computer or device gets disconnected – or if you need to add a new device to your network – follow these quick steps:
- Find the list of WiFi networks on your computer.
- Click on “Join Other Network” or “Other”.
- Enter the name of your network in the blank space (including any spaces, capital letters or symbols).
- Choose “WPA/WPA2 Personal” for your password and enter the password. Don’t forget to click “Remember this Network” or else you’ll have to do this every time.
- Click “Connect”.
If you have any trouble, log back into your WiFi router and double check the network name and password.
Sadly, you’ll have to do this for every device that was using the network, including things like your phone, tablets, SmartTVs and IoT devices.
Final Thoughts | Setting Up a Hidden WiFi Network
Setting up a hidden network isn’t the most secure way to protect your home, but it can be a deterrent for the average neighborhood hacker. You can also configure a VPN (Virtual Private Network) on your router, which requires a good router VPN.
No matter what you do, a hidden network doesn’t take the place of a good password. Make sure you lock your WiFi network with a good password. (here are some tips on creating secure passwords).
The downside to hidden networks is the added pain of reconnecting all your devices, including any smart TVs, gaming consoles or Apple TVs (for more, here’s a tutorial on setting up a VPN on an Apple TV).



My pleasure, James. Thanks for the comment!
My pleasure! I’m glad it’s been useful.